Propagate Elderberries from Cuttings: How to Guide
This post will teach you how to propagate elderberry plants from hardwood cuttings on a budget. Growing elderberries at home can be rewarding and beneficial to your health!
Growing elderberries from cuttings can save you a ton of money over buying cuttings from a nursery. If you live in an area where elderberries grow wild like I do, you can propagate elderberry from cuttings for free from wild plants!
In addition to all the health benefits of elderberry syrup and jam, these plants provide great habitat and food for birds, deer, elk and moose! Beautiful white flowers and light green foliage also add real beauty to your landscape.
It’s a good idea to grow elderberry shrubs at home.
Key Takeaways
- Elderberry plants can be successfully propagated from hardwood cuttings taken in late winter or early spring before leaf buds break open.
- Each cutting requires 4-6 leaf buds and must be soaked in water for 24-48 hours before being planted in potting mix to develop roots over 6-8 weeks.
- Elderberries grow best in rich, well-drained, fertile soil with plenty of organic matter and require full sun exposure for maximum productivity.
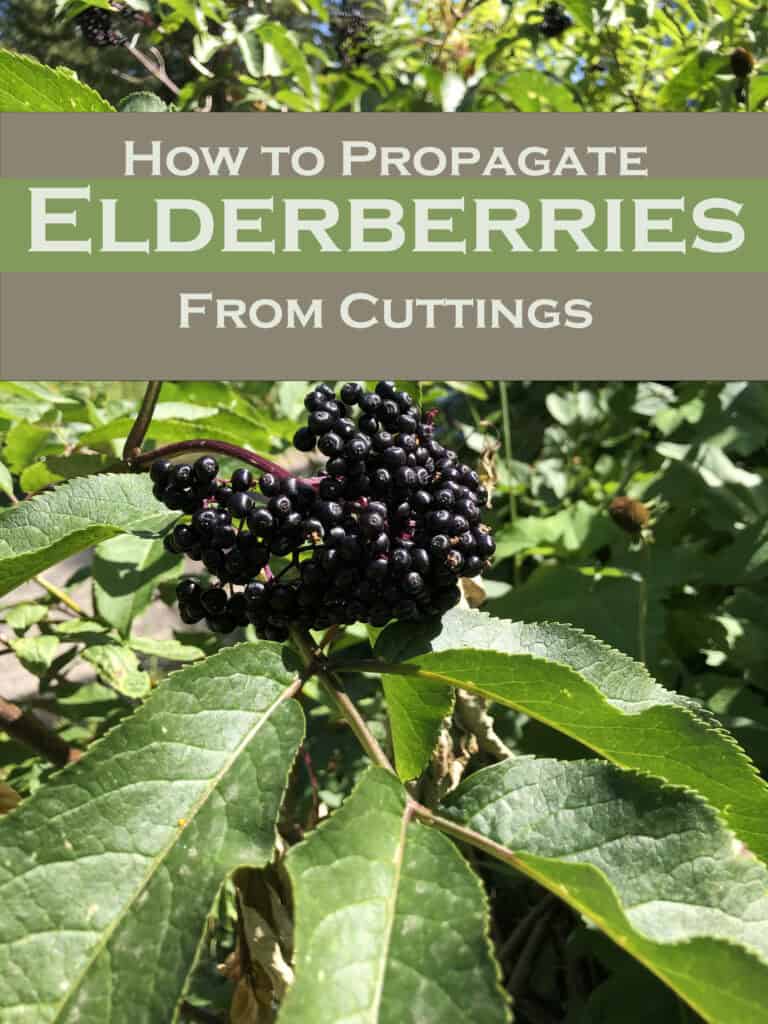
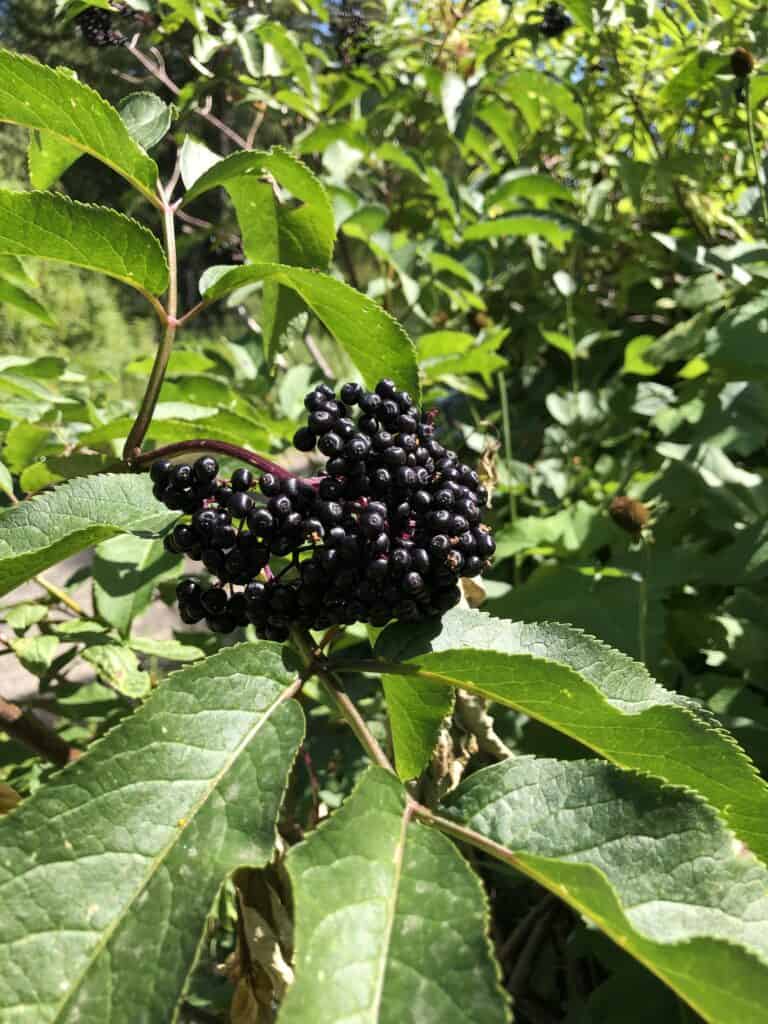
- Wild elderberries can be identified by their 9-12 foot tall shrub structure, hollow or soft branches, light green serrated leaves in groups of 5-11, and distinctive clusters of white flowers followed by blue, black, or purple fruit.
- Newly transplanted elderberry cuttings need frequent watering during the first year and should be planted 4-5 feet apart to allow adequate growing space.

ONLINE GARDENING COURSE
Grow Your Own Food: A Complete Guide to Backyard Abundance
After years of growing food for my family and helping countless gardeners overcome their challenges, I’ve packaged everything I know into one comprehensive course!
This is the EXACT system I use that allows me to grow enough food to significantly reduce my grocery bills while enjoying the freshest, most nutrient-dense food possible.
Why Should You Grow Elderberries at Home?
American elderberry (Sambucus) are a genus of flowering native plants in the Adoxaceae family. They are native and widespread in North America, Europe and parts of South America.
Elderberry fruit is widely used to make syrup and jam and has been shown to help relieve flu and upper respiratory infection symptoms. There are two common varieties of elderberries: sambucus canadensis and sambucus nigra.
Some caution is necessary as uncooked elderberry fruit, leaves, branches, and seeds can have toxic properties. Don’t fret about this too much!
Cooking berries and extracting the juice for syrup or jelly renders it safe for consumption.
Using the tips below to propagate elderberry from cuttings will allow you to harvest elderberries right from your own backyard. Grow your own elderberries for homemade elderberry syrup, juice, and jams.
Best Time to Take Hardwood Cuttings for Elderberry Propagation
The best time of year to get cuttings from elderberries is in the late winter or early spring. It is ideal if you cut the branches before the leaf buds break open.
If you aren’t going to use the cuttings right away, you can place them in a clear plastic bag with a wet paper towel and put them in the refrigerator until you are ready to start the rooting process.
Regional Cutting Collection Calendar by USDA Zone
| USDA Zone | Optimal Cutting Window | Backup Window |
|---|---|---|
| Zones 3-4 | Late March – Early April | Mid-February |
| Zones 5-6 | Early March – Late March | Late February |
| Zones 7-8 | Late February – Mid-March | Early February |
| Zones 9-10 | Mid-January – Late February | December |
Elderberry Soil Requirements
Elderberries prefer rich, well drained, fertile soil with plenty of organic matter. If your soil is less than ideal, work in a few inches of compost before planting your elderberries.
Soil Amendment Guide for Different Starting Soil Types
| Your Soil Type | Amendment Needed | Amount Per Plant |
|---|---|---|
| Heavy Clay | Compost + Peat Moss | 6-8 inches mixed in |
| Sandy Soil | Compost + Aged Manure | 4-6 inches mixed in |
| Rocky/Compacted | Topsoil + Compost | 8-10 inches mixed in |
| Loamy (Ideal) | Compost Only | 2-3 inches mixed in |
Elderberry Light Requirements
Elderberries prefer full sun. While they can grow in shaded areas, they will be more productive if they have full access to sun. Pick a sunny spot to plant your elderberries.
The Best Way to Identify Elderberries in the Wild
- Look for a tall shrub from 9-12 feet tall with many branches billowing out from a common base
- Elderberry shrubs typically grow in moist habitats that have good drainage. In my area, they tend to grow in the forest on north or east-facing slopes.
- If you break a branch, you will often find that it is soft or hollow in the middle.
- The bark on new growth in smooth and brown.
- Leaves are 2-5 inches long, 1-2 inches wide, and light green with serrated edges. The leaves are slightly hairy.
- The leaves are in groups of 5-11 leaves that grow opposite from each other on 1 branch.
- Flowers are small and white in clusters at the end of the branch. Blooming usually occurs in July and August in North America.
- Blue, black or purple fruit forms in late summer in distinctive clusters. Unripe berries are green. Branches often bend with the weight of the fruit clusters.
Elderberry vs. Dangerous Look-Alike Quick ID Chart
| Feature | Safe Elderberry | Toxic Look-Alike |
|---|---|---|
| Branch Interior | Hollow or soft pith | Solid wood |
| Leaf Arrangement | Opposite pairs, 5-11 leaflets | Alternate pattern |
| Berry Clusters | Flat-topped or drooping | Upright pyramids |
| Flower Color | White to cream | Red, yellow, or pink |
How to Start Elderberry Cuttings
Reading Branch Age Through Bark Texture
Most guides tell you to take “last year’s growth,” but knowing exactly which branches will root successfully requires understanding how elderberries naturally display branch age. Here’s a quick way to assess cutting quality before you ever leave the field.
Premium Cuttings (roughly 90% success rate): Smooth brown bark with a slight sheen, pencil-thick diameter, 8-12 inches long, minimal scarring.
Reliable Cuttings (roughly 70% success rate): Light brown to gray bark with slight texture, slightly thicker than a pencil, 10-14 inches long, some leaf nodes visible.
Risky Cuttings (roughly 40% success rate): Gray-brown bark with rough texture, finger-thick diameter, heavier wood, fewer visible nodes.
The quick touch test: gently squeeze the branch between your thumb and forefinger. Premium cuttings have a slight give without feeling spongy. Rock-hard means it’s too old; compresses too easily means it’s too young. You’re looking for flexible firmness.
Timing tip: take cuttings when daytime temperatures have reached 35-45°F for three consecutive days. This signals the plant’s transition from dormancy to active growth — the moment when stored carbohydrates are moving through the branches and natural rooting hormone concentration is at its peak.
Harvesting Elderberry Cuttings
- In the late winter/early spring (late February in my area), locate proven elderberry bushes that you have harvested elderberries from in the past.
- Using sharp pruners, cut branches that are last years growth. Make a flat cut straight across the branch. These branches are often smaller and near the end of the branch. Make sure each branch has at least 4-6 leaf buds.
- Cut more branches than you think you will need as not all branches will successfully grow roots. I wanted to plant about 15-20 bushes, so I took 25 cuttings.
- Bring home these branches and soak the cut side of the branch in water for 24-48 hours. A 5 gallon bucket with some water in the bottom works great. You can add rooting hormone to the water to encourage growth, but it isn’t necessary.
- After the branches have soaked in water for 24 hours, push each branch into a pot with good potting mix and water well. You can put several branches in one pot as you will separate these later when you plant them outside. I put 5 branches in each 1/2 gallon pot.
- Place these potted cuttings in a dark cool place (I have mine in my unfinished basement) and check them every couple of days to make sure the potting soil is staying moist. We don’t want these to dry out!
Transplanting Your Rooted Elderberry Cuttings Outdoors
- In 6-8 weeks these cuttings should have formed some roots. You can tell they have roots if you tug on the young plants gently and there is some resistance. Your new plants need enough roots to endure transplanting.
- These new plants can now be separated and planted in your desired location.
- Amend the soil with some good compost, potting soil, or organic matter and plant these cuttings 4-5 feet apart to allow them space to grow! It’s always a good idea to get a soil test!
- Your new elderberry plant will need frequent watering the first year to encourage root development. Keep soil moisture at optimum levels to encourage a better root system.
What’s Happening Underground: A Week-by-Week Timeline
Understanding the hidden root development process takes the guesswork out of those long weeks in the basement. Here’s exactly what’s happening inside your pots.
Weeks 1-2: Callus Formation. The cut end forms protective callus tissue — look for white or cream-colored bumps. Keep soil consistently moist but not saturated. Aim for 55-65°F. No visible top growth yet, and that’s completely normal.
Weeks 3-4: Root Initiation. Microscopic root primordia begin forming beneath the callus tissue. You’ll see no external changes, but this is when about 60% of failures happen due to moisture inconsistency. Check soil moisture every 2 days using the finger-to-knuckle test. During this phase, reduce watering frequency slightly but increase humidity by placing a clear plastic bag loosely over each pot — the callus has formed but roots haven’t emerged yet, so the cutting can’t efficiently absorb water on its own.
Weeks 5-6: Root Emergence. White root tips emerge from the callus tissue and begin exploring the soil. A very gentle tug will show slight resistance. First tiny leaf buds may begin swelling. Gradually increase light exposure by moving pots closer to a basement window or adding a grow light.
Weeks 7-8: Root Establishment. The root system develops secondary branching. Clear resistance felt during gentle tug test. New green growth appears at top nodes. Ready for transplanting when roots are 2-3 inches long and the cutting has 3-5 new leaves.
Troubleshooting Guide: Common Cutting Problems & Quick Fixes
| Problem | Cause | Solution |
|---|---|---|
| Cutting turns black | Rot from overwatering | Reduce water, improve drainage |
| Buds shrivel up | Too dry or too warm | Increase moisture, move to cooler spot |
| Mold on soil surface | Poor air circulation | Add fan, reduce watering frequency |
| No root growth at 8 weeks | Too cold or poor cutting quality | Increase temperature to 60-65°F |
Hardening Off and Transplanting
The transition from basement to outdoor garden is where many successfully rooted cuttings fail. This three-day protocol eases that transition.
Day 1: Place potted cuttings in full shade outdoors when temperatures are above 50°F. Water lightly and bring inside after 4 hours. Check for severe wilting — if leaves droop dramatically, the roots aren’t established enough and you should wait another week.
Day 2: Move to dappled shade (under tree canopy or shade cloth) for 8 hours. Water midday if the soil surface feels dry. Leaves should recover fully by evening. If they remain curled, cut your Day 3 sun exposure by half.
Day 3: Move to a spot with morning sun only (2-4 hours of direct sunlight) for 10 hours. Keep soil consistently moist.
Transplant day: Plant in early morning or late afternoon when temperatures are coolest. Dig a hole twice the width of the root ball, water the site before and after planting, and apply a 3-inch mulch ring around the base (keeping mulch 2 inches away from the stem).
First-week watering formula: Days 1-3, water daily at 1 gallon per plant. Days 4-5, water every other day. Days 6-7, water every third day, then transition to a weekly deep-watering schedule.
One more tip: plant in groups of 3-5 cuttings in one area rather than individually. Survival rate increases when elderberries are clustered because they naturally retain more soil moisture around the root zone.
First Year Growth Timeline & Maintenance Schedule
| Timeframe | Expected Growth | Care Required |
|---|---|---|
| Months 1-3 | 12-18 inches, establishing roots | Water 2x weekly, mulch application |
| Months 4-6 | 24-36 inches, lateral branching | Water weekly, light fertilizer |
| Months 7-9 | 3-4 feet, woody stem development | Water weekly, monitor for pests |
| Months 10-12 | 4-5 feet, preparing for dormancy | Reduce watering, winter mulch |

Most Important Things to Remember
- Timing is everything. Cuttings taken in late winter or early spring before bud break contain the highest concentration of stored carbohydrates and natural rooting hormones, resulting in success rates above 80% compared to only 40-50% for cuttings taken at other times.
- Consistent moisture is critical during the 6-8 week rooting period. The cutting has no functional roots yet and depends entirely on the stem’s ability to uptake moisture while forming callus tissue and root primordia.
- Each cutting must have 4-6 leaf buds to ensure enough stored energy for both root formation below ground and new shoot growth above ground. The bottom buds generate roots; the upper buds produce leaves after transplanting.
- The hollow or soft pith inside branches is the single most reliable field ID characteristic for wild elderberries, distinguishing them from potentially toxic look-alikes that have solid wood interiors.
- First-year watering directly determines long-term plant survival. Elderberries propagated from cuttings need frequent watering to establish deep root systems that will support the plant through subsequent growing seasons and drought conditions.
Frequently Asked Questions
Can I propagate elderberries from softwood cuttings taken in summer?
Yes, softwood cuttings taken in late spring or early summer can work, but they require more intensive care including misting systems, humidity domes, and constant monitoring. Success rates are typically 20-30% lower than hardwood cuttings. Softwood cuttings need to be kept in high humidity environments and rooted within 3-4 weeks before they dry out or develop fungal issues.
How long does it take for elderberry plants started from cuttings to produce fruit?
Elderberries propagated from hardwood cuttings typically produce their first significant berry crop in the second or third growing season. First-year plants may produce small flower clusters, but it’s best to remove these to allow the plant to focus energy on root and branch development. By year three, you can expect full production with multiple large berry clusters per plant.
Do I need more than one elderberry plant for pollination and fruit production?
While elderberries are partially self-fertile, planting at least two different varieties significantly increases berry yield and size through cross-pollination. Even if you’re propagating from the same parent plant, having multiple elderberry bushes nearby attracts more pollinators and results in better fruit set. Plant them within 60 feet of each other for optimal pollination.
What’s the difference between American and European elderberry varieties for propagation purposes?
American elderberry (Sambucus canadensis) is generally hardier in cold climates (zones 3-9) and has slightly smaller berries, while European elderberry (Sambucus nigra) tolerates zones 5-8 and produces larger fruit clusters. Both propagate equally well from hardwood cuttings using the same methods. American varieties tend to have better cold tolerance and disease resistance in North American growing conditions.
Can I propagate elderberries from cuttings if I live in a warm climate with no winter dormancy period?
In warm climates (zones 9-10) where elderberries don’t experience true winter dormancy, you can still propagate from cuttings but should take them during the coolest months (December-January) when growth naturally slows. Store cuttings in a refrigerator for 4-6 weeks before starting the rooting process to simulate dormancy. This cold stratification period helps trigger the hormonal changes needed for successful root development.
Pin for later