
Easy Fermented Salsa: The Best Fresh Salsa Recipe
There’s nothing quite like the taste of fresh salsa made with tomatoes, peppers, and herbs straight from your garden. But when you add fermentation to the mix, you transform simple homemade salsa into something truly special. This lacto-fermented salsa recipe combines the bright flavors of pico de gallo with the tangy depth that only the fermentation process can provide.
Why Fermented Salsa Is My Favorite Salsa
I’ll be honest: I never thought I could improve on my go-to fresh salsa recipe until I tried fermenting it. The tangy flavor that develops during fermentation adds complexity that makes your taste buds come alive. Plus, you’re getting all those health benefits from the good bacteria and live cultures that support gut health and your immune system.
Unlike regular salsa that lasts just a few days in the fridge, this lacto-fermented salsa has an impressive shelf life. When stored properly in cold storage, it keeps for up to six months. Though at our house, a batch rarely makes it past taco night!
The Magic of Lacto-Fermented Foods
Fermentation might sound complicated, but it’s actually one of the simplest and best ways to preserve your harvest. When you combine fresh ingredients with salt and allow them to sit at room temperature, beneficial bacteria naturally present on the vegetables begin to work their magic. These lactic acid bacteria convert sugars into lactic acid, which preserves the food and creates that signature tangy flavor.
The fermentation process also produces carbon dioxide, which is why you’ll see small bubbles forming in your fermentation jar. These bubbles are clear signs of fermentation at work. This is the same process that creates homemade sauerkraut, homemade yogurt, and other traditional lacto-fermented foods that have nourished families for generations. It’s a delicious way to eat more probiotic-rich foods while reducing food waste.
Garden-Fresh Ingredients Make the Best Salsa
This recipe truly shines when you use vegetables straight from your garden or farmer’s market. Last summer, I had lots of tomatoes ripening all at once, and fermenting was the perfect solution. Roma tomatoes work beautifully, but honestly, any variety of fresh tomatoes will give you excellent results.
The combination of fresh cilantro, jalapeño pepper (or your favorite hot peppers), onions, and garlic creates layers of flavor that develop beautifully over the fermentation time. If you’re growing your own, there’s something deeply satisfying about walking out to your garden and harvesting all your salsa ingredients in one trip. Even picky eaters who typically shy away from spicy salsa often love this version because the fermentation mellows the heat while adding depth.
Don’t have a garden? No problem! Your local farmers market is a great way to source high-quality ingredients. Just look for the freshest produce available. The only thing you absolutely need to avoid is chlorinated water, which can inhibit the good bacteria you’re trying to cultivate.

What You’ll Need for This Lacto-Fermented Salsa Recipe
The ingredient list is wonderfully simple. You’ll need about 1½ pounds of fresh tomatoes, one onion, half a jalapeño pepper (or a whole fresh hot pepper if you want spicy salsa), seven garlic cloves, ¾ teaspoon cumin, ½ cup fresh cilantro, ½ tablespoon lime juice, and 1 tablespoon of non-iodized salt.
That salt deserves special attention because you must use sea salt or another high-quality, non-iodized option. Table salt contains iodine and anti-caking agents that can prevent proper fermentation and kill the beneficial bacteria you’re trying to encourage. It’s worth investing in good salt for all your lacto-fermented foods.
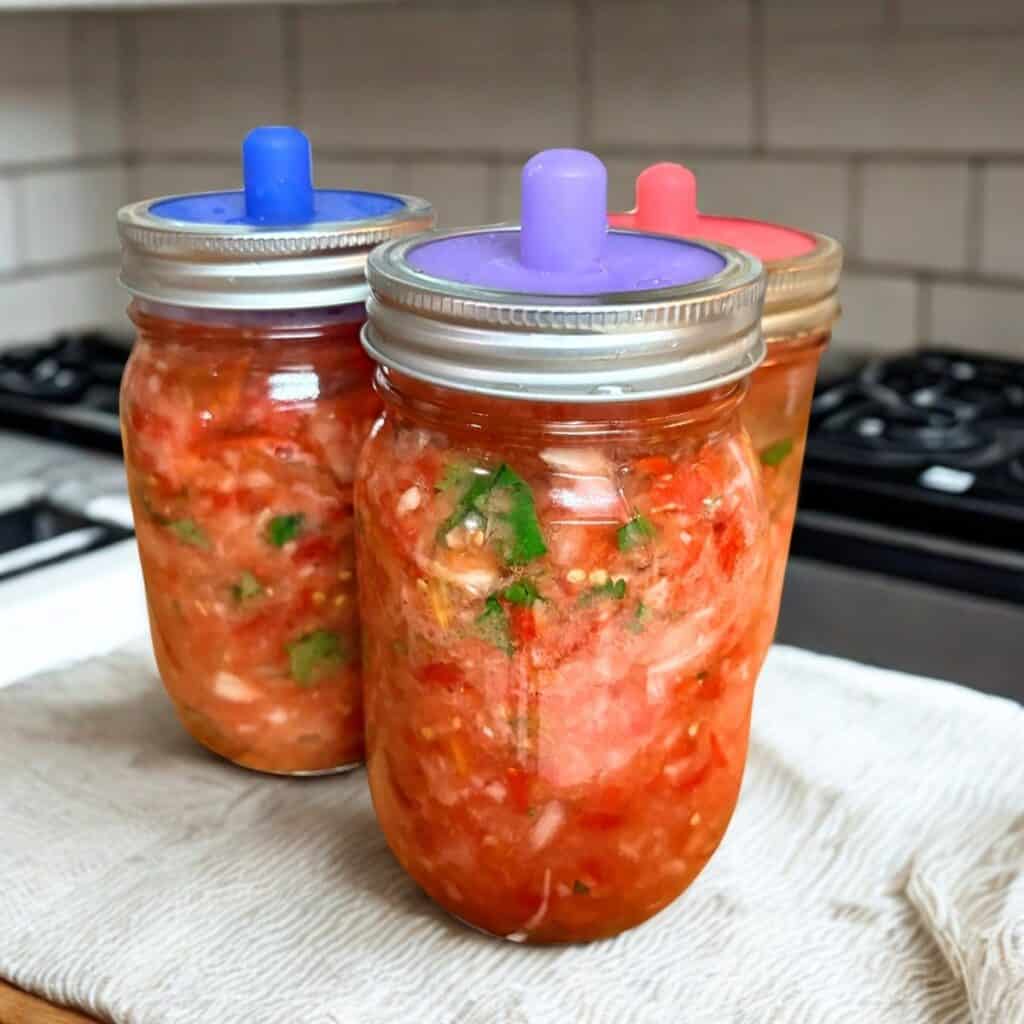
For equipment, you’ll need a food processor, glass jars (mason jar quart jars work perfectly), and a fermentation weight to keep the salsa ingredients submerged below the liquid line. If you have fermentation lids with airlocks, they’re helpful but not essential. Regular canning lids work fine for a first batch.
How to Make Fermented Salsa
Start by quartering your tomatoes and adding them to your food processor. Pulse them until they’re chopped to your desired consistency. You want chunky salsa texture, not tomato soup! The key is stopping before you’ve liquefied everything.
Transfer the chopped tomatoes to a large bowl. If you spot any large chunks that are bigger than you’d like, just pull them out and dice them smaller with a knife. This gives you more control over the final texture than trying to get everything perfect in the processor.
Next, add your onion, jalapeño, and garlic cloves to the food processor. Pulse until everything is chopped to match your tomatoes. Some people like smoother salsa while others prefer it chunky. Add these remaining ingredients to your bowl with the tomatoes and stir to combine.
Mix in the cumin first, stirring thoroughly so it distributes evenly throughout the salsa. Then add your fresh cilantro and combine well. Finally, add your salt and mix until it’s completely incorporated. This step is crucial for proper fermentation.
Now comes the fun part: use a funnel to transfer your salsa into clean glass jars. Pack it down gently as you go, but leave about half an inch of headspace at the top of the jar. This allows room for the gas bubbles that will form during fermentation.
Place a fermentation weight on top of the salsa to keep all the solids pushed beneath the liquid line. This prevents bad bacteria from taking hold and ensures your fermentation stays on track. You can buy fermentation weights here.
If you’re using airlock lids or fermentation lids, secure them now. Otherwise, regular canning lids with a tight-fitting lid work fine. Just “burp” the jar once a day by loosening the lid briefly to release built-up carbon dioxide. Set your jars in a dark place away from direct sunlight where they can ferment at room temperature. You can buy fermentation lids here and airlock lids here.
The Fermentation Time and What to Expect
Let your salsa ferment for three days at room temperature. You’ll start noticing signs of fermentation within 24 hours. Look for small bubbles rising through the salsa, a slightly tangy aroma, and the liquid becoming cloudier. This is exactly what you want to see!
Some people worry when they see cloudiness or bubbles, thinking something has gone wrong. But these are actually good signs that the lactic acid bacteria are doing their job. Occasionally you might see a thin white film on top called kahm yeast. It’s harmless and can simply be scraped off with a clean spoon.
After three days (or a couple of days longer if your house is cool), taste your salsa. It should have developed a pleasant tangy flavor that’s distinctly different from fresh salsa. If you want more fermentation, you can let it go another day or two based on your personal taste.
Storing Your Fermented Salsa
Once your salsa has fermented to your liking, it’s time for cold storage. Remove any airlock lids and replace them with regular canning lids, then move your jars to the refrigerator. The cool temperature essentially stops the fermenting process while keeping those beneficial bacteria alive.
Properly fermented salsa will keep in the fridge for up to six months, and sometimes up to a year. At our house, we go through it much faster because it’s become our go-to for everything from tortilla chips to topping scrambled eggs. Some people even use it as a starter culture for their next batch of fermented vegetables!
For long-term storage beyond six months, a dedicated extra ferment fridge (we have one in our basement) works great. Just ensure your salsa stays cold and the jar remains sealed until you’re ready to use it.
Tips for Your First Time Making Fermented Salsa
If this is your first time fermenting, don’t overthink it. The fermentation process is remarkably forgiving. Start with this recipe as written, and next time you can adjust the heat level, add a green pepper, or experiment with different varieties of hot peppers.
Some folks add a tablespoon of sauerkraut juice or the liquid from water kefir grains as a starter culture to jumpstart fermentation. While this can speed things along, it’s not necessary. There are already enough lactic acid bacteria on your fresh vegetables to get the process going naturally.
One common question: can you use lemon juice instead of lime juice? Absolutely! Both work well, though lime juice is more traditional in Mexican-inspired salsas. Some people even add a small drizzle of olive oil to their finished salsa for extra richness, though this isn’t part of the traditional fermentation method.

Why This Recipe Works So Well
The beauty of this fermented salsa is how it bridges the gap between fresh and preserved. You get the vibrant flavors of garden vegetables with the depth and complexity that only fermentation provides. The beneficial bacteria support your immune system and gut health, making this a truly nutritious addition to your meals.
Plus, it’s a good idea to have a batch in your fridge at all times because it’s incredibly versatile. Use it on tacos, mix it into scrambled eggs, spoon it over grilled chicken, or simply enjoy it the traditional way with tortilla chips. It’s also a delicious way to use up abundant garden harvests when tomatoes and peppers are producing faster than you can eat them fresh.
Last year, I tripled the recipe and made many jars at a time when my garden was in full swing. Having fermented salsa on hand meant I could pull together a quick meal anytime, and the long shelf life meant nothing went to waste. It’s become one of my favorite ways to preserve the summer harvest.
The Health Benefits of Fermented Salsa
Beyond the incredible flavor, fermented foods offer real health benefits. The good bacteria produced during lacto-fermentation are the same beneficial microorganisms that support a healthy digestive system. These live cultures help maintain gut health and can support your overall immune system.
Unlike commercial salsa that’s often pasteurized (killing any beneficial bacteria), this homemade version keeps all those good bacteria alive and thriving. It’s similar to eating homemade sauerkraut or other traditional fermented foods that have been prized for their health-promoting properties for centuries.
The fermentation process also makes the nutrients in the vegetables more bioavailable, meaning your body can absorb them more easily. It’s a double win: better taste and better nutrition in one simple recipe.
Making It Your Own
Once you’ve made your first batch and gotten comfortable with the basic recipe, feel free to experiment. Some good options include adding extra cumin for smokiness, throwing in a few leaves of fresh basil alongside the cilantro, or using different varieties of hot peppers for varied heat levels.
Just don’t go below 1 tablespoon per 1½ pounds of vegetables, as you need enough salt to inhibit bad bacteria while encouraging the beneficial ones. Too much salt will slow fermentation, while too little won’t preserve the salsa properly.
For a chunkier salsa, chop everything by hand instead of using a food processor. For smoother salsa, pulse the processor a few extra times. The recipe is flexible and forgiving, so make it work for your personal taste and texture preferences.
Troubleshooting Common Issues
If your salsa isn’t showing signs of fermentation after a couple of days, check these common issues: Is your house very cold? Fermentation slows significantly below 65°F. Did you use iodized table salt? This can kill the beneficial bacteria. Was everything kept below the liquid line? Exposure to air can cause problems.
If you see mold (fuzzy growth in colors other than white), it’s best to discard that batch and start fresh. But don’t confuse mold with kahm yeast. That harmless white film that forms on top is perfectly safe to remove and doesn’t affect the salsa underneath.
Remember, successful fermentation relies on creating the right environment for good bacteria to thrive while preventing bad bacteria from taking over. Salt, submersion below the liquid, and proper temperature are your three keys to success.
Why This Is Better Than Store-Bought
There’s simply no comparison between this lacto-fermented salsa and what you buy at the store. Commercial salsas are pasteurized for shelf stability, which kills all the beneficial bacteria and live cultures. They’re often loaded with preservatives and lack the complex, tangy flavor that fermentation provides.
When you make your own, you control every ingredient. You know exactly what’s going into your food: high-quality ingredients from your garden or trusted sources, no weird additives, and all those gut-healthy probiotics intact. Plus, the cost savings are significant, especially if you’re growing your own vegetables.
The flavor is incomparably fresher and more vibrant than anything from a jar. Once you’ve tried truly fresh salsa made with garden tomatoes and enhanced by fermentation, going back to store-bought just isn’t satisfying.
Final Thoughts
This easy fermented salsa recipe has become a staple in our kitchen, and I think it will in yours too. It’s the perfect way to preserve abundant garden harvests, enjoy the health benefits of lacto-fermented foods, and always have delicious, probiotic-rich salsa on hand. The fermentation process transforms simple ingredients into something special: a condiment that’s somehow both familiar and excitingly different from regular salsa.
Whether you’re new to fermentation or you’ve been making homemade sauerkraut for years, this recipe is a great way to expand your repertoire. It requires minimal equipment, uses straightforward techniques, and delivers impressive results every single time.
So grab those fresh tomatoes, jalapeños, and cilantro from your garden (or farmers market), and give this recipe a try. Your taste buds and your gut health will both thank you!
Pin for Later


Easy Fermented Salsa: The Best Fresh Salsa Recipe
Learn to make tangy fermented salsa with fresh tomatoes and peppers. This probiotic-rich recipe keeps for months!
Ingredients
- 1 1/2 pounds tomatoes
- 1 onion
- 1/2 jalapeño
- 7 cloves garlic
- 3/4 teaspoon cumin
- 1/2 cup cilantro, chopped
- 1/2 Tablespoon bottled lime juice
- 1 Tablespoon non-iodized salt (use a high quality salt)
Instructions
- Add quartered tomatoes to your food processor and pulse until chopped to desired consistency. Transfer to a large bowl and cut any oversized chunks smaller by hand.
- Place onion, jalapeño, and garlic in the food processor and pulse until chopped. Add to the bowl with tomatoes and mix well.
- Stir in cumin until evenly distributed throughout the salsa.
- Add cilantro and mix thoroughly.
- Add sea salt and stir until completely incorporated.
- Use a funnel to transfer salsa into clean glass jars, leaving about 1/2 inch of headspace at the top.
- Place fermentation weights on top to keep all solids submerged below the liquid line.
- Secure airlock lids (or regular canning lids) and place jars in a dark spot at room temperature for three days.
- After three days, replace with regular lids and store in the refrigerator for up to 6 months. Enjoy!
Notes
Fermentation Time: Let your salsa ferment at room temperature for 3 days, or up to 5 days for a tangier flavor. You'll know fermentation is working when you see small bubbles rising through the salsa and the liquid becomes slightly cloudy. Taste after 3 days and continue fermenting if you prefer a stronger tangy flavor.
Storage: Once fermentation is complete, store your salsa in the refrigerator with regular lids. It will keep for up to 6 months in cold storage, though the flavor will continue to develop over time. The cool temperature slows fermentation while keeping all the beneficial bacteria alive.
Jar and Lid Options: Use pint-sized mason jars or any glass jars with tight-fitting lids. Fermentation lids with airlocks or pickle pipes make the process easier, but regular canning lids work in a pinch. If using regular lids, simply "burp" the jar once daily by loosening the lid briefly to release carbon dioxide. Fermentation weights are essential to keep solids submerged.
Nutrition Information:
Yield: 10 Serving Size: 1Amount Per Serving: Calories: 22Total Fat: 0gSaturated Fat: 0gUnsaturated Fat: 0gSodium: 554mgCarbohydrates: 4gFiber: 1gSugar: 2gProtein: 1g
East Fork Growing LLC is a participant in the Amazon Services LLC Associates Program, and the NutriMill affiliate program. These affiliate advertising programs are designed to provide a means for us to earn fees by linking to Amazon.com, NutriMill.com and affiliated sites. These products do not cost anymore to you, but we earn a small commission if you use our links. Thanks for your support!