
How to Plant and Grow Sweet Corn: A Complete Guide
Nothing compares to homegrown sweet corn fresh from your garden. While corn plants have a reputation as a hungry plant requiring specific growing conditions, home gardeners can successfully grow this warm-season crop with proper techniques and understanding. Learn how to grow corn with this comprehensive guide even if your soil isn’t ideal.

Understanding Different Types of Corn
Different types of corn include field corn, flour corn, ornamental corn, and sweet corn varieties. Sweet corn varieties are the most common for home gardeners.
Sweet corn varieties can be divided into three distinct genetic types: standard (su), sugar-enhanced (se), and supersweet (sh2).
Standard Sweet Corn (su)
Standard (su) sweet corn delivers classic corn flavor but converts sugar to starch quickly after harvest. Standard varieties are best if they are picked, husked, and eaten within a short timeframe.
Sugar Enhanced Sweet Corn (se)
Sugar enhanced (se) varieties contain a gene that significantly raises the sugar content above standard varieties. Sugar enhanced varieties still retain the tender and creamy texture with added sweetness. Sugar enhanced varieties are great for fresh eating or preservation by freezing.
Supersweet Varieties
Supersweet (sh2) types feature the highest sugar content and longest storage life of freshly picked husks. These varieties must be isolated from other corn types by at least 250 feet or 14 days difference in planting time to prevent unwanted cross pollination.
Site Selection and Soil Preparation
Sweet corn requires full sun and well-drained soils for best results. A soil test can help determine if you have fertile soil and optimal pH.
Light Requirements
Corn needs a minimum of 6-8 hours of direct sunlight daily for proper growth and ear development. Avoid planting near trees or structures that could cast shadows during peak sunlight hours.
Soil Considerations
The ideal soil pH ranges from 6.0 to 6.8, with 6.5 being optimal for nutrient availability. Heavy soils should be amended with organic matter to improve drainage and aeration.
Space Planning
Plan about 10-15 square feet per person for a good supply of sweet corn. Tall stalks can reach 7-8 feet high and cast significant shade, so arrange your garden layout accordingly.

How to Plant Corn
Timing Strategies
Monitor soil temperatures before you plant corn – warm soil of at least 60°F (16°C) is crucial. For a continuous harvest, plant short rows every two weeks, following your last frost date as your starting point.
Succession Planting
Choose varieties with different maturity dates to extend your harvest season. Plant early, mid, and late varieties simultaneously for staged harvests. Learn more about succession planting here.
Planting Techniques
The planting depth should be about 1 inch deep in light soil, slightly shallower in heavy soils. Plant seeds approximately 12 inches apart with rows 3 feet apart. For good pollination, pollen grains need to reach all silk strands, making it essential to plant in blocks rather than single rows.
Make sure to keep the soil moist until corn seed germinate which can take anywhere from 5-10 days depending on the soil and air temperature.
Block Planting Method
Create blocks of at least 4 rows, with rows spaced 30-36 inches apart. Space plants 12-15 inches apart within rows for proper development.
How to Grow Corn in Different Climate Zones
Short-Season Growing Regions
Gardeners in northern regions or high elevations face unique challenges with their compressed growing season. Choose early-maturing varieties (65-75 days to maturity) such as ‘Early Sunglow’, ‘Sugar Sprint’, or ‘Quickie’ for these shorter seasons.
Season Extension Techniques for Short Seasons
Use black plastic to warm soil temperatures before planting and consider row covers for early-season frost protection.
Long-Season Growing Regions
Gardeners in southern regions can take advantage of their extended growing season by planting multiple successions of corn. Consider a combination of early, mid, and late-season varieties ranging from 75-92 days to maturity.
Variety Selection by Growing Season Length
Short Season Areas (Less than 120 frost-free days)
- Extra-Early Varieties (65-70 days): ‘Early Sunglow’, ‘Sugar Buns’, ‘Trinity’
- Early Varieties (70-75 days): ‘Sugar Sprint’, ‘Quickie’, ‘Spring Treat’
Medium Season Areas (120-150 frost-free days)
- Mid-Season Varieties (75-85 days): ‘Peaches & Cream’, ‘Ambrosia’, ‘Incredible’
- Main Season Varieties (80-85 days): ‘Silver Queen’, ‘Golden Cross Bantam’
Long Season Areas (More than 150 frost-free days)
- Main Season Varieties (80-85 days): ‘Silver Queen’, ‘Golden Cross Bantam’, ‘Jubilee’
- Late Season Varieties (85-92 days): ‘Super Sweet Jubilee’, ‘Florida Staysweet’
Strategic Planning for Different Seasons
In short-season areas, focus on one or two plantings of early varieties. For long-season regions, plant a early variety first, followed by main-season variety 2 weeks later, and finish with a late-season variety for extended harvests.
The Brown Paper Method: A Game-Changing Technique for Challenging Soils
Like many home gardeners, I struggled for years to grow healthy corn in my heavy clay soil with low nitrogen levels. Traditional growing methods resulted in stunted plants, poor ear development, and disappointing harvests.
The Discovery
After years of frustration and nearly giving up on growing corn, I developed this innovative paper-and-compost method that transformed my corn growing success. The results were remarkable: tall stalks, full ears, and significantly less maintenance.
How the Method Works
This technique creates an ideal growing environment by addressing multiple challenges simultaneously. The paper layer blocks weed growth and retains moisture, while the compost provides steady nutrition and improves soil structure over time.
Step-by-Step Implementation Guide
Initial Soil Preparation
- Test your soil to understand its current composition and pH level. Break up the soil surface to about 6 inches deep in your planting rows, removing any rocks or debris.
Planting Phase
- Plant corn seeds according to packet instructions in the prepared planting rows and water thoroughly.
Seedling Emergence
- Wait until corn seedlings have emerged from the soil and are showing good vigor. This typically takes 7-10 days in warm soil.
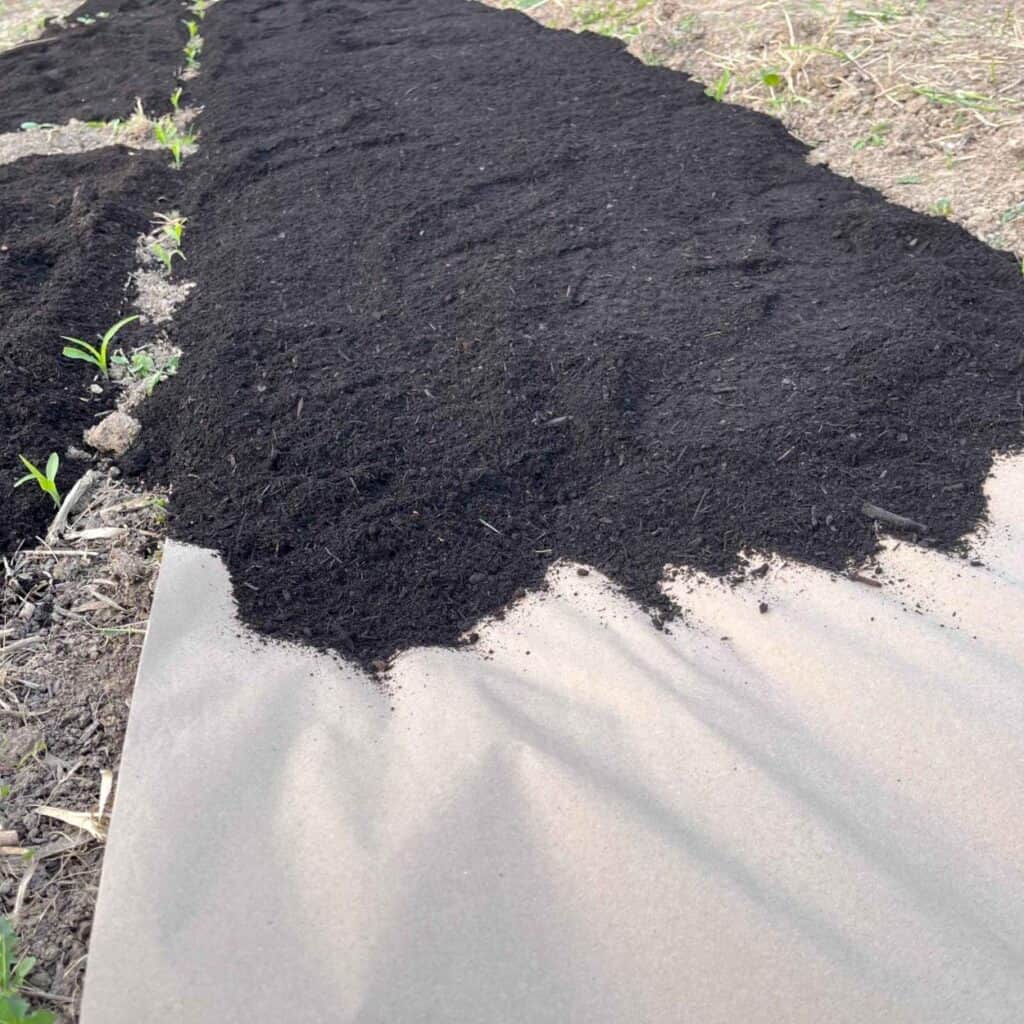
Paper Layer Installation
- Choose plain brown paper or uncoated paper bags (avoid glossy or colored paper). Roll out or lay paper between rows, overlapping edges by 2-3 inches to prevent weed breakthrough. I like to use this big roll of unbleached paper. Make sure you cover the entire soil surface between your corn rows.
Compost Application
- Apply 3-4 inches of well-aged compost directly on top of the paper. Use compost rich in nitrogen sources.
- Extend compost slightly beyond paper edges to ensure complete coverage. Pull the compost around each corn seedling to create a mulching effect.
Special Considerations
Timing
Implement this method during the early growth stage when plants are established but before they reach knee height. This timing allows for easy access between rows while maximizing the benefits during critical growth periods.
Maintenance
Monitor moisture levels by checking under the compost layer weekly. The paper-compost combination significantly reduces watering needs, but consistent moisture remains crucial during tasseling and ear development.
Long-Term Benefits
This method continues to improve soil quality season after season. The decomposing paper adds carbon while the compost introduces beneficial microorganisms and nutrients.
Adaptations for Different Climates
In wet regions, reduce compost depth to 2-3 inches to prevent excessive moisture retention. In arid areas, increase compost depth to 4-5 inches and consider adding a straw or grass clipping layer on top for additional moisture retention.

Advanced Growing Techniques
Supporting Tall Stalks
In windy areas, consider creating wind breaks or supporting corn stalks with temporary fencing. Hill soil around the base of plants when they reach 6 inches tall to provide additional support.
Companion Planting
Traditional Native American “Three Sisters” planting combines corn with pole beans and squash. The beans provide nitrogen while corn offers support, and squash shades the soil.
I love growing pumpkins and squash between my corn rows. Learn more about companion and succession planting here.
Comprehensive Care Guide
Water Management
Corn needs about an inch of water weekly during vegetative growth, increasing to 1.5 inches during tasseling and ear development. Soaker hoses provide an effective way to water at the base of the plant without wetting foliage.
Critical Watering Periods
The most crucial irrigation times are during pollination and kernel fill. Water stress during these periods can result in poor kernel development and partially filled ears. Maintaining consistent soil moisture is the best way to set your corn up for growing success.
Fertility Program
Corn plants are heavy feeders. If you soil is not high in nitrogen, you may need to suppliment with blood meal or other nitrogen fertilizers. If you use the compost and paper method described above, you will not need to supplement with additional nitrogen.

Pest and Disease Management
Common Insect Pests
Corn earworm and European corn borers frequently attack sweet corn ears. Monitor for eggs on leaves and young larvae before they enter ears.
Prevention and Treatment
Apply mineral oil to ear tips when silks brown to deter corn earworm. Use appropriate Bt (Bacillus thuringiensis) products for organic control of corn borers.
Disease Recognition and Control
Watch for common corn diseases like rust, smut, and leaf blights. Practice crop rotation and choose resistant varieties for your area.
Avoid Pest Problems
Maintain good air circulation between plants and avoid overhead watering. Remove infected plants promptly to prevent disease spread.
Harvesting and Storage
Determining Maturity
The milk stage indicates perfect ripeness – kernels should release a milky liquid when punctured with a fingernail. Check ear development by peeling back a small section of husk near the tip.
Harvest Timing
Plan to harvest early in the morning when temperatures are cool. Sweet corn typically matures 17-24 days after first silk appearance, so make note of your corn plant development in your garden journal.
Storage Best Practices
Sweet corn ears are best eaten immediately after harvest, as the higher sugar content in modern varieties converts to starch quickly. For best results, cool ears to 35°F within one hour of harvest.
Preservation Methods
For long-term storage, blanch corn cobs and freeze corn kernels cut from the cob. Process within 2-3 hours of harvest for best quality.

Troubleshooting Common Problems
Poor Pollination
Incomplete kernel set often indicates insufficient pollination. Plant in blocks and avoid using overhead sprinklers during tasseling.
Nutrient Deficiencies
Yellow lower leaves typically indicate nitrogen deficiency, while purple leaves suggest phosphorus deficiency. Adjust fertilization or amend soil accordingly.
While growing sweet corn requires attention to specific needs, the reward makes it worthwhile for home gardeners. Using techniques like the brown paper method can help overcome challenging soil conditions, leading to a successful harvest of this beloved summer crop.
These gardening tips will help you learn how to grow corn successfully in your home garden.
Planning for Next Season
Save information about successful varieties and timing for future reference. Consider rotating your corn patch to different garden areas every year to prevent soil depletion and reduce disease problems.
It’s a great idea to keep a garden journal to keep track of what seeds did well, what area of your garden each crop was planted, and more! Go here for a free printable garden diary PDF!
Pin for Later


I tried and failed with corn last year so thank you for the tips!
I’ve tried and failed more times with corn than I’d like to admit, but once I started using these techniques, my corn has been wildly successful every year!
Great post! Growing corn on Central Florida seems to elude us! Can’t wait to try out your suggestions!😁
Corn can be tricky to grow with it’s heavy nitrogen needs and it’s unique pollination. Hope these tips move you closer to success!
Very informative post! Being from Indiana- there is nothing like fresh sweet corn in the summer! Can’t wait to attempt growing my own this summer!
Yes there’s nothing quite like growing your own sweet corn. Best of luck on your garden journey!
Love how detailed this is! Super comprehensive and right to the point.
So happy you found this helpful!
How helpful. Thank you for sharing this guide. I don’t feel as lost.