
How to Make Sourdough Rolls (Just Like Texas Roadhouse!)
Get ready to bake the best sourdough dinner rolls you’ve ever tasted! These soft sourdough dinner rolls are fluffy, slightly sweet, and absolutely irresistible. With simple ingredients and an easy recipe, you’ll be making pull-apart sourdough dinner rolls that rival your favorite steakhouse (think Texas Roadhouse).
Inspired by those famous Texas Roadhouse rolls we all love! This homemade version is not affiliated with or endorsed by the restaurant.

Why You’ll Love These Sourdough Dinner Rolls
These aren’t just any traditional dinner rolls – they’re enriched with wholesome ingredients that make them extra special! Here’s what makes this sourdough dinner roll recipe so amazing:
- Simple ingredients: You’ll use basic pantry staples like all purpose flour, salt, honey, an active sourdough starter, and warm milk
- Budget-friendly: Save money by making homemade rolls instead of dining out
- Perfect for any occasion: Whether it’s Thanksgiving dinner, the holiday season, or a casual weeknight meal, these rolls are always a hit at the dinner table
- Make-ahead friendly: Prepare the dough ahead and bake fresh when you need them
- Fermentation benefits: The long fermentation process breaks down phytic acid, creating a lower glycemic index than store-bought bread
What Makes These the Best Sourdough Dinner Rolls
The secret to the fluffiest rolls is in the enriched dough. Unlike lean dough used in crusty sourdough bread, this recipe includes honey, butter, and whole milk which create that signature soft texture. The active sourdough starter does all the work during the bulk fermentation time, developing incredible flavor while creating a fluffy crumb inside.
These pull-apart rolls are a perfect side to any weeknight dinner menu or alongside cranberry sauce, green bean casserole, or any dish on your Thanksgiving menu!
Tips for Success
Before you begin, feed your sourdough starter 4-12 hours before starting this recipe. You want an active starter that’s bubbly and has doubled in size. This is crucial for soft sourdough rolls that rise beautifully!
Here are my top tips:
- Make sure you’re working at room temperature with your ingredients (except the butter, which should be melted)
- If your kitchen is cool, find a warm place for the dough to rise – even a turned-off oven with the light on works great!
- Don’t rush the rise time. The dough needs proper bulk fermentation time and a good final proof to achieve that perfect texture
- Use a dough hook attachment on your stand mixer if you have one, though this recipe works great by hand too

Great Questions I Get About This Recipe
Can I use whole wheat flour? Yes! You can substitute up to half of the all purpose flour with whole wheat flour for added nutrition. Just realize that you may need to add a little more milk because whole wheat flour tends to absorb more liquid than all-purpose flour.
What if I only have sourdough discard? This recipe really needs an active starter to create the proper dough rise. Feed your discard and wait until it’s bubbly before using it.
Can I use a bread machine? You can use your bread machine on the dough cycle for mixing, but I recommend doing the shaping and baking by hand for best results.
How long is the rising time? Plan for about 12 hours of bulk fermentation plus 3-4 hours for the final proof. The temperature of your kitchen will affect this – warmer spots mean faster rising!
Ingredients You’ll Need
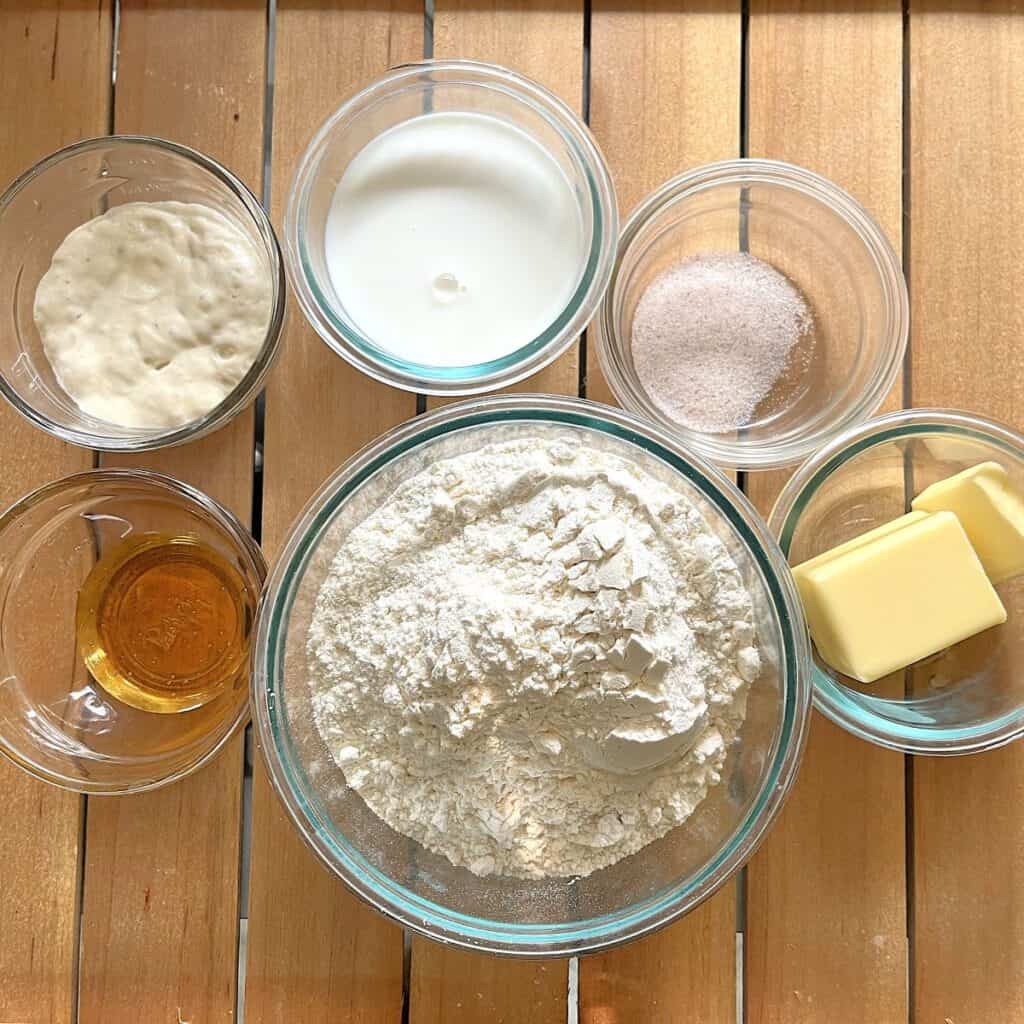
- Active sourdough starter (about 1/2 cup starter): Fed and bubbly, at room temperature
- All purpose flour or bread flour: Either works wonderfully! Bread flour gives slightly more surface tension for taller rolls
- Whole milk: Warm milk helps create that soft texture
- Sea salt: Enhances all the flavors
- Melted butter: Use real butter for the best taste
- Raw honey: Adds natural sweetness
- More melted butter: For brushing the golden brown rolls before and after baking
Kitchen Tools You’ll Love


How to Make Sourdough Dinner Rolls
Mix the Dough
Start by combining your bubbly active starter, warm milk, honey, melted butter, and sea salt in a large mixing bowl. Stir everything together until it’s well blended. You can do this in the bowl of a stand mixer or just use a regular mixing bowl – both work perfectly!
Next, add your all purpose flour (or bread flour) to the wet ingredients. Begin mixing on low speed if using a mixer with the dough hook attachment, or use your hands to bring everything together. Mix until you have a smooth dough that clears the sides of the bowl. If the mixture feels too sticky, add flour one tablespoon at a time. If it’s too stiff, add a splash of milk.
Turn your dough out onto a clean work surface and knead by hand for about 2 minutes. You can also let your stand mixer do this work on medium speed. The dough should feel soft and slightly tacky but not sticky. This creates the perfect dough’s structure for soft rolls!
Place the smooth dough back in your bowl and cover it loosely with a damp tea towel, shower cap, or an airtight container with the lid slightly ajar.
Bulk Fermentation (First Proof)
Now comes the magic! Let your dough rest in a warm place at room temperature for about 12 hours. This is your bulk fermentation time, and it’s when all the wonderful sourdough recipes magic happens! The long fermentation process breaks down the flour, making these easier to digest than commercial yeast rolls.
Your dough should double or even triple in size and have active bubbles throughout. If you peek under the towel and see lots of small bubbles and the dough springs back slowly when you poke it, you’re ready for the next step!
Sample timeline: If you mix your dough at 8 PM, it should be ready to shape around 8 AM the next morning.
Don’t have time to continue? No problem! Once your first proof is complete, you can place the covered bowl in the fridge with an airtight container lid for up to 24 hours. This is perfect for the casual sourdough baker who needs flexibility!
Shaping Individual Rolls
When your bulk fermentation is complete, it’s time for the fun part – shaping! Uncover your dough and gently press it down to release the gas bubbles.
Line your baking tray or greased baking dish with parchment paper. Now you’ll divide the dough into individual rolls.
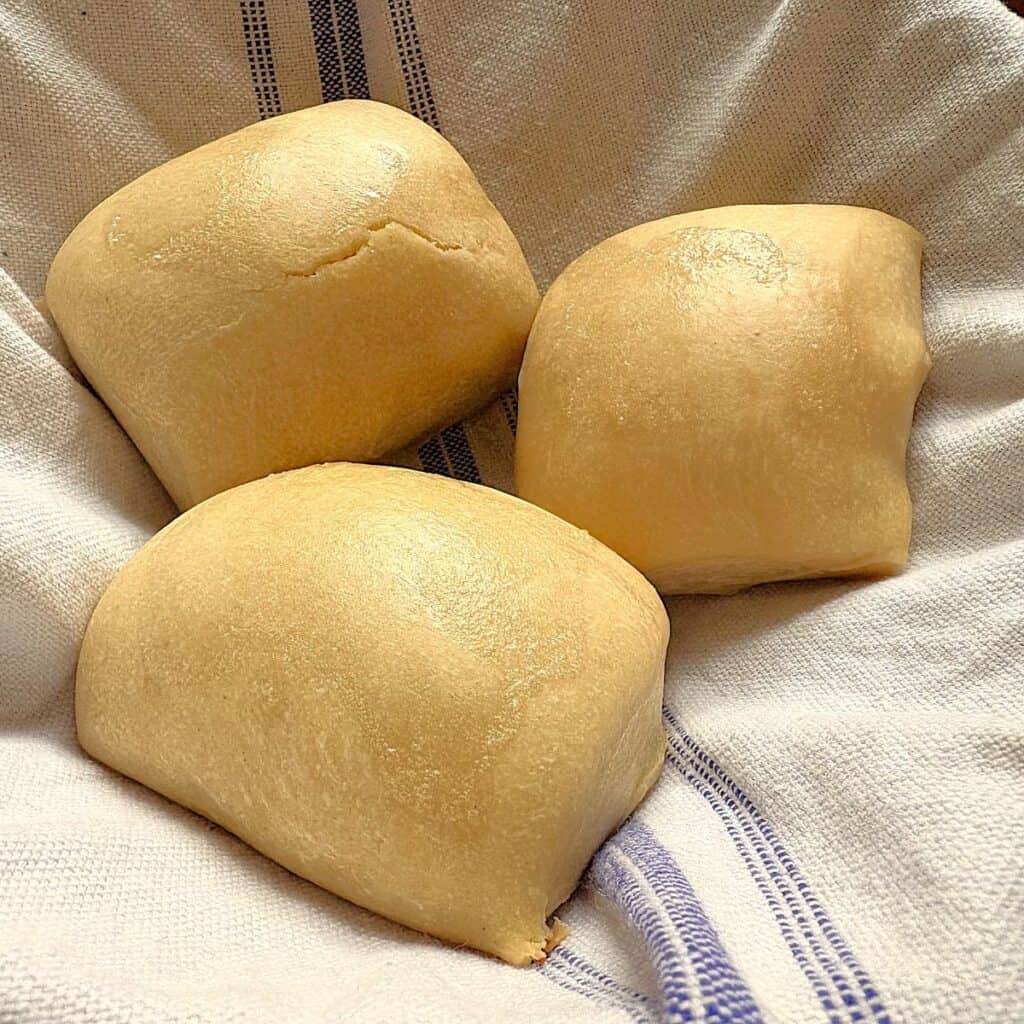
Spread dough on a floured surface into a rectangle about 1/2 inch thick. Bring the long edges together by folding in half, sealing by pressing with your fingertips. Cut into 8-10 portions with your bench scraper.
Place your shaped rolls on your parchment lined baking dish, leaving a little space between each one (about 1 inch apart).

Second Rise (Final Proof)
Cover your dough squares with a damp tea towel, or plastic wrap. Place them in a warm spot and let them rise for 3-4 hours. This final proof is essential for achieving those fluffiest rolls! The rolls should look puffy and nearly doubled in size. When you gently press on the top of the dough, it should spring back slowly.
If your kitchen is on the cooler side, this rising time might take longer. The temperature of your kitchen really does matter! Be patient – good things come to those who wait.

Baking Your Rolls
About 30 minutes before baking, preheat your oven to 375°F (190°C).
When your rolls have completed their final proof, it’s time for the finishing touches! Gently brush the top of the rolls with melted butter. This creates that beautiful golden brown color and gives them a golden crust that looks bakery-perfect.
Place your baking tray in the preheated oven and bake for 18-22 minutes, until the rolls are golden brown on top. You can check the internal temperature with a thermometer – it should read about 190°F when they’re done.
As soon as you remove the hot rolls from the oven, brush them generously with melted butter. This adds incredible flavor and keeps them soft!
Let them cool for just a few minutes (if you can wait!), then pull them apart and enjoy them warm. These pull-apart sourdough dinner rolls are absolutely heavenly fresh from the oven!
How to Serve These Soft Sourdough Dinner Rolls
These rolls are incredibly versatile! Serve them warm with:
- Butter and honey (classic!)
- Homemade cinnamon honey butter (just like the restaurant!)
- Alongside soups and stews
- With your Thanksgiving dinner spread
- Next to a hearty roast or steak
They’re the perfect addition to any meal and make homemade bread feel special without being complicated.
Storage Instructions
Store your leftover rolls in an airtight container at room temperature for 2-3 days. They stay soft and delicious!
You can also wrap individual rolls in aluminum foil and store them this way to keep them fresh.
To reheat: Warm them in a 300°F oven for about 5 minutes, or microwave for 15-20 seconds. Brush with a bit of melted butter after reheating for that fresh-baked taste!
Freezing Instructions
These rolls freeze beautifully! Here’s how:
To freeze baked rolls: Let them cool completely, then wrap each roll in plastic wrap and place in a freezer bag. They’ll keep for up to 3 months. Thaw at room temperature and reheat as directed above.
To freeze unbaked dough: After shaping your dough balls, place them on a baking tray and freeze for 1 hour. Then wrap each frozen roll in parchment paper and store in a freezer-safe container. When you’re ready to bake, place frozen rolls on a baking tray, cover, and let them thaw and rise in a warm place for 4-5 hours. Then bake as directed!
Why This Recipe Works for Busy Bakers
As a casual sourdough baker myself, I know you need recipes that fit into real life! The beauty of this sourdough dinner roll recipe is that you can:
- Mix the dough the night before and shape the next morning
- Make the dough in the morning and bake that same evening
- Prepare everything ahead and freeze for the holiday season
- Work it around your schedule using the fridge between steps
Unlike traditional dinner rolls made with commercial yeast that require precise timing, sourdough is much more forgiving. Your own sourdough starter works more slowly, giving you flexibility and better flavor!
More Delicious Sourdough Recipes to Try
Once you master these rolls, you’ll want to try:
- Sourdough cheddar chive biscuits
- 4 ingredient sourdough bread
- Whole wheat sourdough bread
- Sourdough sandwich bread
- Sourdough waffles
Why Sourdough is Worth It
If you’re new to sourdough baking, you might wonder if it’s worth the effort compared to using commercial yeast. Here’s why I think it absolutely is:
The long fermentation process in sourdough recipes breaks down compounds in the flour that can be hard to digest. This includes phytic acid, which can prevent nutrient absorption. The result? Bread with a lower glycemic index that’s easier on your digestive system than store-bought bread.
Plus, there’s something incredibly satisfying about creating homemade bread using your own sourdough starter. It connects you to centuries of bakers who made bread this way!
Final Tips for the Best Results
- Temperature matters: Keep ingredients at room temperature for best results
- Don’t rush: Both the bulk fermentation and final proof need adequate time
- Watch the dough, not the clock: Your dough will tell you when it’s ready by how it looks and feels
- Create steam: Place a pan of water on the bottom oven rack for extra soft rolls
These soft sourdough dinner rolls truly are an easy recipe that yields impressive results! Whether you’re preparing for the holiday season or just want to elevate your next meal, this recipe will become a family favorite.
The combination of an active sourdough starter, proper rise time, and that final brush of butter creates the most amazing texture: soft and fluffy inside with a beautiful golden crust outside. Your family will think you spent hours in the kitchen (but we know better!).
So gather your ingredients, feed that active starter, and get ready to make the best sourdough dinner rolls! Your dinner table is about to get a serious upgrade.


Sourdough Dinner Rolls (Just Like Texas Roadhouse!)
These soft sourdough dinner rolls are fluffy, slightly sweet, and perfect for any meal. With simple ingredients and straightforward steps, you'll be making bakery-quality rolls at home!
Ingredients
- 1/2 cup active sourdough starter
- 1 cup whole milk (warmed to room temperature)
- 2 Tablespoons honey
- 1/4 cup melted butter
- 2 teaspoons salt
- 3 cups all-purpose flour
- 1 Tablespoon melted butter for brushing tops
Instructions
- Combine wet ingredients: In the bowl of a stand mixer or a large mixing bowl, combine your active starter, warm milk, honey, melted butter, and sea salt. Stir until everything is well mixed.
- Add flour: Pour in the all purpose flour. Using a dough hook attachment on medium speed (or your hands), mix until a smooth dough forms and pulls away from the sides of the bowl. The dough should be soft but not sticky. Adjust with small amounts of flour or water if needed.
- Knead: Turn dough onto a clean work surface and knead for 2 minutes by hand, or use your stand mixer on medium speed. The dough should feel smooth and elastic.
- First rise (bulk fermentation): Place the smooth dough back in your bowl. Cover with a damp tea towel, shower cap, or loosely with plastic wrap. Let it rest in a warm place at room temperature for 12 hours. The dough should double in size and have visible bubbles throughout.
- Shape rolls: Spread dough on a floured surface into a rectangle about 1/2 inch thick. Bring the long edges together by folding in half, sealing by pressing with your fingertips. Cut into 8-10 portions with your bench scraper.
- Arrange for baking: Place dough squares on a parchment-lined baking tray, leaving about 1 inch of space between them.
- Second rise (final proof): Cover the rolls with a damp tea towel or plastic wrap and place in a warm spot. Let rise for 3-4 hours until puffy and nearly doubled. When lightly pressed, the top of the dough should spring back slowly.
- Prepare to bake: Preheat oven to 375°F (190°C) about 30 minutes before baking.
- Brush with butter: Gently brush the top of the rolls with butter for that beautiful golden brown finish.
- Bake: Place in preheated oven and bake for 18-22 minutes, until golden brown on top.
- Finish with butter: Remove from oven and brush the tops with more melted butter for extra flavor and softness.
- Serve: Let cool for just a few minutes, then pull apart and enjoy warm!
Notes
Nutrition Information:
Yield: 10 Serving Size: 1Amount Per Serving: Calories: 237Total Fat: 7gSaturated Fat: 4gTrans Fat: 0gUnsaturated Fat: 2gCholesterol: 18mgSodium: 480mgCarbohydrates: 38gFiber: 1gSugar: 5gProtein: 5g
Pin for Later

East Fork Growing LLC is a participant in the Amazon Services LLC Associates Program, and the NutriMill affiliate program. These affiliate advertising programs are designed to provide a means for us to earn fees by linking to Amazon.com, NutriMill.com and affiliated sites. These products do not cost anymore to you, but we earn a small commission if you use our links. Thanks for your support!